It’s second day of Eid here, and I hope you’re all enjoying! 😉 I’ll be doing an Eid post too but next week. 🙂
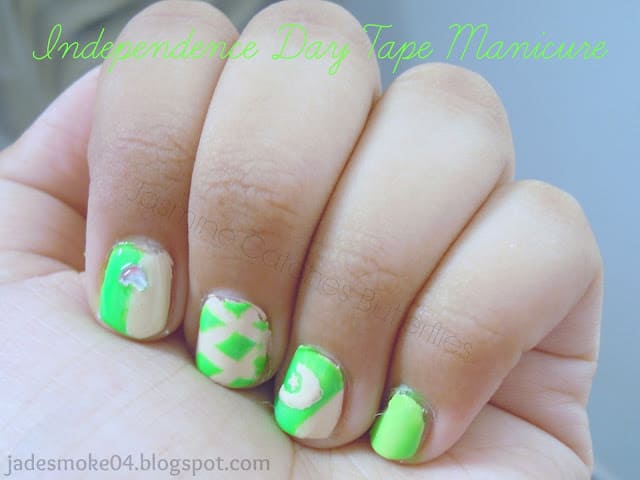
As it’s Saturday, I’m posting another nail tutorial for you guys and since next week we have our Independence Day on 14th August, this Saturday’s theme had to be related to that. 🙂
Here are three ways you can do your nails this year and all of these require tape. 🙂 You can do any one of them on all your nails or mix and match like I did! 🙂 x
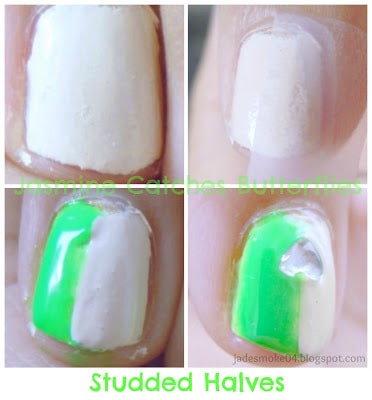
Tape Manicure #01: Studded Halves
Requirements: Tape, Scissors, White Nail Polish, Green Nail Polish and a Nail Gem (optional).
Steps:
1. Paint your nails white.
2. When the white nail polish dries, put a piece of tape on half of your nail.
3. Paint the untaped half of your nail green and while the polish is still wet, take the tape off slowly.
4. Apply a top coat and put your nail gem on the border line of the two nail polishes.
5. Clean any over spills with the help of a q-tip soaked in nail polish remover and seal in your design with another top coat. This will also ensure that the nail gem does not come off.
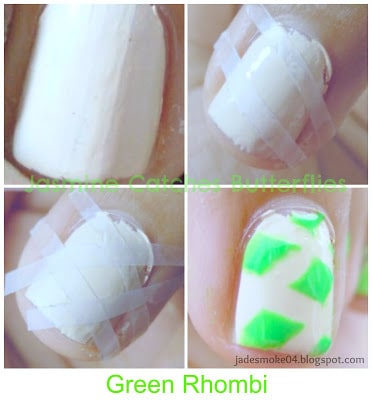
Tape Manicure #02: Green Rhombi
(Being a science kid, I just couldn’t think of anything better to name this pattern! 😛 )
Requirements: Tape, Scissors, White Nail Polish and Green Nail Polish.
Steps:
1. Cut thin, uniform strips of tape and try to cut the strip of the same thickness each time.
2. Put the strips in a criss-cross manner as shown in the photo and press the sides of the tape properly so that the other nail color does not seep in.
3. Paint your nail green over the tape strips and while the polish is still wet, slowly and carefully peel the strips off.
4. Clean any over spills with the help of a q-tip soaked in nail polish remover and seal in your design with another top coat.
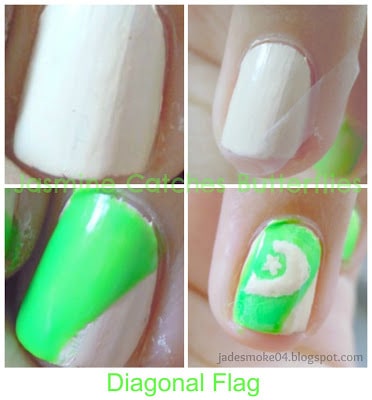
Tape Manicure #03: Diagonal Flag
Requirements: Tape, Scissors, White Nail Polish, Green Nail Polish and a Toothpick.
1. Paint your nails white.
2. Cut a thin strip of tape and put it diagonally on the top left side of your nail as shown in the photo.
3. Carefully paint the greater side green and slowly take the tape off while the polish is still wet.
4. Once the polish dries, using a toothpick draw a small crescent (make the edges pointy unlike mine!) and a star as shown in the photo.
5. Clean any over spills with the help of a q-tip soaked in nail polish remover and seal in your design with another top coat.
Still looking for independence day manicure ideas? Why don’t you go for green hearts on a white background? Check out my Hearts 3 Ways tutorial.
Bloglovin’ | Facebook | Twitter | Pinterest | Goodreads


cute..!
Eid mubarak
Khair Mubarak! 🙂 x
Happy Eid hun! Love tutorial, xoxo.
I mean't to include "the" in love the tutorial lol, xoxo.
Thanks dear! 🙂 Don't worry about typos! 🙂 x
Happy Eid my lovely! Such a pretty design, and very poignant! xx
Gemma | ♥ Miss Makeup Magpie ♥
Thanks sweety! 🙂 xx
So detailed 🙂
Thanks 🙂 x
Oh my goodness, thanks so much for sharing! I'm definitely going to be trying the studded one! It looks complicated at first lol I had no idea it'd be that easy to do! 😀
http://www.hudasbeauty.blogspot.com
Aww! Thank you! 😀 x
you made it look so easy! love the tutorial:) xx
Aww! Thanks dear! 🙂 x
These are gorgeous! Great tutorial hun! xx
Thanks dear! 🙂 x
That looks great! I love neon colours on the nails 🙂 x
http://www.anacelinelabod.blogspot.de
Thanks Ana! Me too! 🙂 x